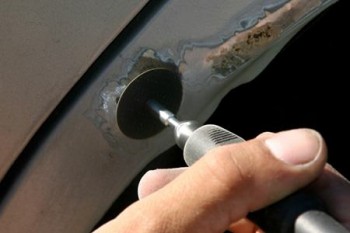
Rust usually begins through the chips and cracks you receive from the pebbles and stones that hit your car through daily driving. With a small nick exposing bare metal in an unnoticeable location, rust will begin to form.
Once rust begins to happen, it cannot be stopped, only repaired. Whether you spend many of thousands of dollars on your homemade electric car or a couple of hundreds of dollars, you want to keep it looking nice.
While after spending so much money on your EV, you may not be left with a lot of money to repair damages such as rust. Below is a guide to repairing the rust without emptying your pockets.
A few things you will need include a good amount of elbow grease, a fibreglass cloth kit, electric grinder and cordless drill, spreader, sandpaper and sanding discs. Here are 10 easy steps to fixing the rust on your car:
Step 1 – Access where the rust is located.
Once finding the rusted spots, remove all excess trim and loose debris from the corroded part of the vehicle. Next, remove the rusted metal but leave enough to keep the shape of the electric car.
Step 2 – Prepare the electric grinder with 24-grit disc.
Just about 4 inches from the edge of the rust hole, grind all traces of the rust including the primer and paint.
Step 3 – Sanding.
Using a 100-grit sanding block, sand the corroded surface until it is clear and shiny. Using a ball-peen hammer, tap around the edges of the rust hole, slightly turning it inwards.
Step 4 – Filming rust hole.
Cut the release film from the fiberglass cloth kit about three inches larger than the sanded area. Using this piece of film, place it over the rust hole. Use a pencil to mark this area but do not wrinkle the film.
Step 5 – Covering.
To cover the rust hole, cut two pieces of Fibreglass matte. Cut one piece of this matte about one inch smaller than the size of the first matte.
Step 6 – Using repair jelly.
Spread the cut release film over it a layer of auto body repair jelly. The film needs to be facing outward. Next, take the smaller fiberglass matte and place it over the release film with the jelly.
Spread more repair jelly to the smaller fiberglass matte and place the larger cloth on it.
Step 7 – Filling.
After step 6 is completed, place the entire repair material over the rust hole. Again, the film must be facing outward.
Going in an outward motion, use a spreader to smooth it out over the rust hole. Remove all bubbles and follow the shape of the car.
Step 8 – Let the repair set overnight.
Following the next day, remove the release film. Check if the material is completely set. Using an electric drill and sanding disc, sand the repaired area. Finish the repair and sanding using a block sander.
Step 9 – Fill in the low spots with the filler material.
After the filler dries, use an 80-grit sandpaper to file and smooth it out.
Step 10 – Smoothing.
To complete the repair, apply the topcoat and hardener to create a smooth finish. Use a 200-grit smooth the topcoat, then use the 400-grit sanding block to finalize the repaired rust hole.
